
- February 11, 2026
- Posted by: wellcoindustries
- Categories: Burlap, Erosion Control
Introduction
Burlap fabric for landscaping is a practical, biodegradable way to protect bare soil while vegetation establishes—especially on slopes, newly seeded areas, and around fresh plantings. For crews and buyers, the real question isn’t “Does burlap work?” but when it’s the right tool, how to install it so it stays put, and what specs to standardize so performance is consistent across jobs.
Who this is for: agriculture, construction, and soil & water conservation professionals—purchasing managers, contractors, distributors, and OEM/private label buyers.
How this was prepared: compiled from widely used installation guidance (e.g., NRCS and ECTC) plus field-proven procurement and installation checks.
Why it matters: when burlap is installed and specified correctly, it reduces rework risk (rills, washouts, reseeding) during the critical establishment window.
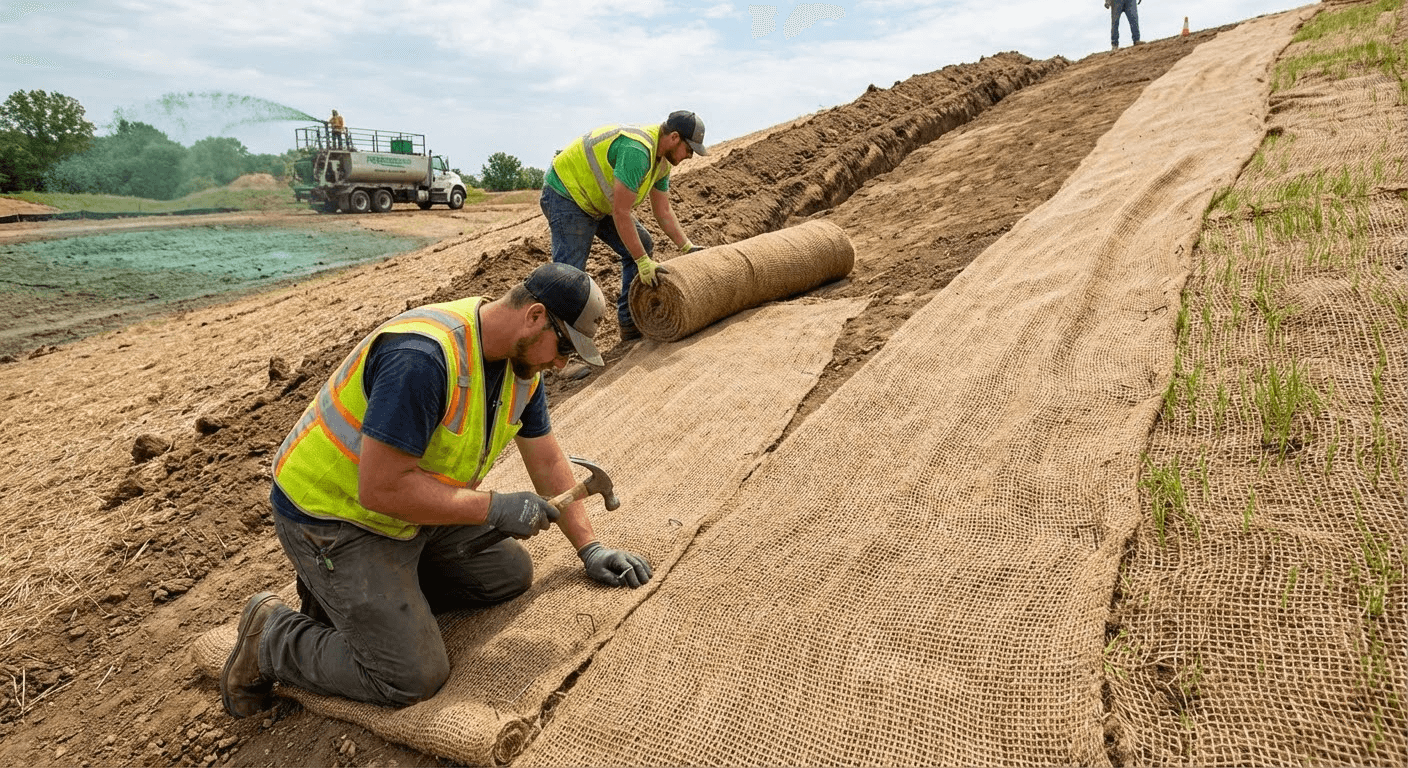
Using burlap fabric for landscaping: when it works best
What burlap is (and isn’t) in landscaping applications
Burlap (typically jute-based) is a woven natural-fiber cover that breathes and lets water infiltrate, which helps seeds and soil amendments stay in place. It’s often grouped with rolled erosion control products (RECPs) used to protect slopes and promote revegetation.
What it does well:
- Reduces surface erosion from light-to-moderate sheet flow and wind
- Holds seed and fine soil in place during germination
- Provides short-term soil protection without leaving plastic fragments behind
Where it’s not the right choice:
- High-velocity flow channels or concentrated runoff paths (needs engineered measures)
- Unstable slopes requiring reinforcement or soil bioengineering systems
- Areas with heavy foot/equipment traffic unless paired with stronger controls
Useful benchmark (installation “stat” that matters): NRCS guidance for jute/blankets specifies installation up-and-down the slope, overlapping edges by at least 6 inches, and burying the top in a trench at least 8 inches deep—a strong indicator that anchoring and seam treatment are non-negotiable.
Ideal use cases: slopes, seed, mulch, and plant protection
Burlap fabric for landscaping tends to deliver the best ROI in these scenarios:
- Newly seeded slopes where you need a temporary surface stabilizer
- Mulch stabilization to reduce blow-off and wash migration
- Tree/shrub establishment zones to moderate moisture and reduce soil splash
- Construction closeout where a biodegradable cover supports short-term stabilization
A quick decision rule: if the goal is to protect soil until roots take hold, burlap can be a good fit; if the goal is long-term separation, filtration, or structural reinforcement, specify an engineered RECP/geotextile instead.
Installation guide: how to lay burlap fabric for landscaping
Site prep: grading, smoothing, and anchoring points
Most “material failures” are actually prep failures. You want a smooth, firm surface so the fabric sits in intimate contact with the soil (no bridging). Many installation guides emphasize removing debris/clods and raking smooth to ensure full contact across the installation.
Before unrolling:
- Final grade the surface and remove protrusions (rocks, clods, construction debris)
- Seed/fertilize per spec before cover (if the plan calls for it)
- Identify where runoff will concentrate and plan extra anchoring there
- Plan the crest anchor first (top-of-slope failure often cascades downhill)
Experience-based install check I use: if you can lift the fabric easily with a boot toe in several spots, you’re likely under-pinned or bridging—both invite wind uplift and water undermining during the first storm.
Step-by-step installation + overlap and pin spacing
A jobsite-ready sequence aligned with common guidance:
- Orient the run: Install up and down the slope (not on contour).
- Cut a crest anchor trench: Bury the upper end in a trench at least 8 inches deep and backfill/compact.
- Roll with contact: Lay the fabric so it touches soil everywhere—avoid “tents” over irregularities.
- Overlap edges: Overlap seams by at least 6 inches across the slope; treat seams like water will test them (because it will).
- Staple/pin to resist uplift: ECTC emphasizes using enough staples to resist uplift from hydraulics, wind, mowers, and foot traffic—and recommends following manufacturer staple patterns/densities.
- Upgrade pinning in risk zones: tighten pin spacing at transitions, swales, the toe of slope, and where runoff concentrates.
Practical “quote-worthy” rule from ECTC: staple density is not arbitrary—plan for uplift forces (wind/hydraulics/traffic) and follow the manufacturer’s pattern as your baseline, increasing where conditions demand.
Performance factors: durability, biodegradation, and weather
How long burlap lasts in sun/rain and what affects lifespan
Biodegradable fibers break down via moisture, microbes, UV exposure, and abrasion. That’s a feature—until it happens too fast for your project timeline. Research on jute biodegradability and modifications is active, and it underscores that treatments and conditions can change strength and service life.
What shortens lifespan:
- Frequent wet/dry cycles, warm moist soil, and high microbial activity
- Direct sun exposure (UV) with minimal cover
- Flutter from wind (usually caused by poor soil contact/pinning)
- Abrasion from maintenance foot traffic or equipment
What helps it last long enough:
- Firm soil contact (less flutter, less abrasion)
- Prompt vegetation establishment through/around the weave
- Robust seam treatment and crest anchoring to prevent water getting underneath
Performance “stat” to ground expectations: ASTM’s RECP performance testing approach evaluates how products protect slopes from rainfall-induced erosion using simulated rainfall under controlled conditions—reminding buyers that “erosion control” is often about measurable rainfall response, not just appearance.
Common failure modes (tearing, slipping, rot) and how to prevent them
- Slipping/creep: almost always a crest anchoring issue—reset the top trench and increase pinning in the upper third.
- Undermining and rilling: seam lift or water concentration—improve overlaps, pin seams more frequently, and address runoff routing (diversion/check measures).
- Tearing: choose heavier weaves/stitched edges for rocky sites and avoid dragging rolls over rough ground.
- Premature breakdown: match the burlap type/spec to the establishment window and consider alternatives for persistently saturated locations.
Product selection for pros: specs that matter to buyers
Weave, weight, roll size, and stitching
For buyers who need repeatable outcomes, specify what installers feel on day one and what the slope experiences on day ten:
- Weave tightness: tighter weave holds fines/seed better; looser weave breathes well but may need more mulch support.
- Material weight & tensile integrity: heavier options generally resist tearing and last longer; lighter options drape and install faster.
- Roll size: reduce seams on long slopes and align with crew handling limits.
- Edge finishing/stitching: stitched edges reduce unraveling and speed seam control.
Expertise upgrade: a simple spec-by-use guide
- Low-to-moderate slopes, mild rainfall: mid-weight weave + standard overlaps + manufacturer staple pattern (then add pins at transitions).
- Steeper slopes, higher runoff risk: heavier weave/blanket form + aggressive seam pinning + strict crest trench.
- Rocky/abrasive sites: prioritize tear resistance and edge finishing; plan extra soil smoothing to prevent bridging.
Sourcing and consistency for contractors, distributors, and OEMs
If you’re buying for multiple crews or reselling under a private label, consistency reduces call-backs:
- Lot-to-lot consistency (weave, weight, edge finish)
- Packaging that survives jobsite handling and weather
- Documented installation guidance and predictable lead times
This is also where supplier breadth can simplify procurement. Wellco Industries, for example, describes itself as a global supplier offering erosion control materials alongside broader agricultural and household product lines—useful when your program prefers fewer vendors and more standardized logistics. (Use this as a capability cue, not a hard sell.)
Field-proven examples and data points
Anonymized slope-stabilization case example
A contractor handling repeated punch-list rework on 3:1 slopes after hydroseeding saw rills appear after the first heavy rain. They changed only three variables:
- Added a real crest trench and verified compaction
- Treated seams as “failure points” (minimum overlap plus denser seam pinning)
- Upgraded pinning in flow-concentration zones (toe/transition areas)
The practical outcome: fewer reseed trips and fewer visible rills—not because weather stopped, but because the cover stayed in contact and didn’t let water get underneath.
One stat/quote + what it means for planning and cost control
NRCS’s numbers are plain and actionable: 8-inch minimum trench depth at the crest and 6-inch minimum seam overlap across the slope, with installation up-and-down slope.
For procurement teams, that translates directly into scope: trenching time, staple quantities, and install QA checks should be in bids and submittals—otherwise “cheap installs” often become expensive revisits.
Limitations and safety considerations
- Don’t use burlap as a standalone solution where runoff is concentrated; route water and add appropriate controls (wattles, check measures, diversions) as required.
- On unstable slopes, consult an engineer—erosion control covers help with surface protection, not slope stability.
- Verify local requirements for erosion/sediment control and document installation to protect schedule and compliance.
Conclusion
Burlap fabric for landscaping can be a strong, people-and-site-friendly solution when you need temporary soil protection that supports revegetation. The performance formula is simple:
- Anchor the crest properly (trench depth matters)
- Treat seams like risk zones (overlap + pin density)
- Standardize specs and QA so crews install consistently across sites
CTA: If you share slope ratio, soil type, rainfall intensity expectations, and your stabilization timeline, I’ll translate that into a procurement-ready spec checklist (material type, roll sizing, seam rules, and an installation QA punch list).
Frequently Asked Questions
Service life varies with moisture, UV exposure, and traffic. In warm, wet conditions it can break down faster, while covered or shaded applications often last long enough to support vegetation establishment. Plan material choice around your site’s “establishment window,” not a fixed calendar.
Not usually. Burlap is best as a temporary surface stabilizer; synthetic geotextiles are often selected for longer-term separation, filtration, or reinforcement needs. Use burlap where biodegradability and short-term stabilization are priorities.
Skipping the crest anchor trench and underestimating seam pinning. When the top edge releases or seams lift, wind and runoff can get underneath and unravel the install quickly.
Standardize by application: slope severity, expected runoff, and soil condition. Then lock in weave/weight targets, roll sizes to reduce seams, minimum overlap rules, and a staple/pin pattern with “upgrade zones” (toe, transitions, concentrated flow areas).
Yes, if the supplier can provide consistent manufacturing, packaging, and documentation. For multi-site programs, consistency and lead time reliability are often as valuable as unit price.